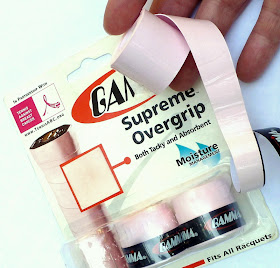
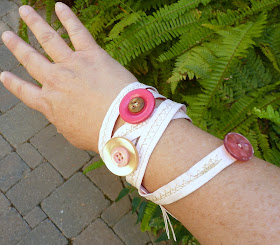
Today, I show you how to make and wear this strappy, button-embellished wrap bracelet...
Made from tennis racquet grip tape.
Ready to DIY? Here we go!
If you can't find tennis racquet grip tape, any type of non-fray material will do. Felt? Vinyl? Leather? Suede? All good.
Cut a piece about an inch wide, long enough to wrap several times around your wrist plus a few inches. Fold in half along the length. (The grip tape is cool for this, it sticks to itself so you don't have to pin it!)
Note: folding in half is optional - if you like, just use a single-layer, half inch wide strip. But a double-thickness strap creates a little more structure.
Next, buy a sewing machine. Spend a week learning to thread it. Spend another week learning to do the bobbin. Spend about eight hours practicing stitching in a straight line. Go quietly insane. Pull yourself together, realize you simply can't stitch in a straight line, and go with that.
Embellish your folded strap with several lines of random, dreadful stitchery, like so:
Can you tell this is my first project using a sewing machine, ever? Ever.
You can make a little tassel with a few snips and a roll:
You can make a little tassel with a few snips and a roll:
Hand-sew the tassel and two sets of stacked buttons at one end, spaced a little apart.
Add a single flat button on the other end...and lookee there! DIY complete!
Now do some wraps, in and out around the stacked buttons. Roughly like so:
You will end up with a bit left over, the single-button end, seen at the bottom right in the photo below:
The final step: take the tail and tuck it under one of the wraps. The flat button will catch against the inside and keep the end in place.
Wala!
As you have probably figured out, this design is essentially a long, thin strip of whatever-you-can-find, whose true purpose is to feature some pretty buttons. So play around, experiment with length and wrapping methods. It's simple, versatile and pretty darn fun.
My groovy friend Kim found a way to wear it as a necklace:
My groovy friend Kim found a way to wear it as a necklace:
She wrapped it as a choker, and loosely knotted the single-button end around the strap. Cute! (If you made one long enough, you could wear it as a belt.)
See you guys soon! I am off to practice on that DRATTED machine. Question to you sewists: HOW LONG until you learned to sew straight? Because I am not making much progress.
But I am having fun.


I have worked in several sewing factories. A one of these, I was a top stitcher ( you know that stitching on either side of a seam on a leather car seat? Only I was stitching them on pontoon seats). The seams had to be STRAIGHT! Actually, whatever is straighter than straight...that is what they had to be. All that was to say 'I learned something! And now I'm going to pass my vast knowledge along to you!' (I'll bet when you woke up this morning, you had no idea this was your lucky day).
ReplyDeleteYou know the 3/4"-1" tape with strings in it you buy from the postal section at walmart? Using a sharp blade, cut down through several layers (1/4" or so deep). Move a couple inches down the roll and make another slice just like the first. Peel that chunk out of the roll and place it on your sewing machine parallel to your pressure foot to let your material slide along as a seam guide. Then tell your friends that your sewing machine frustrated you so you went all postal on it!
Sewing...OMG I took ages to learn...garment construction was one course I dreaded at college. But first we would practice on paper. take some ruled paper and trying stitching on the lines (without the thread ofcourse) then move to diagonals, curved lines and shapes. Then try on fabric. Try doing seams first using the edge of your presser foot as the guide..well nobody said it was easy..if nothing works use fabric glue or stapler like one of my classmates used to do ;)
ReplyDeleteSo bummed out if you're going to use your sewing machine on your next projects. I'm a no-sew projects girl even though I have a sewing machine bequeathed to me by my late mother-in-law specifically in her will (hinting, you think?) I'm still struggling to keep fabric glue from getting all over my projects and clothes!!! But keep on plugging, Mich. I know that if anyone can learn, you can.
ReplyDeleteWhen Jesus Chique talks about the "tape with strings in it you buy from the postal section at walmart" is she talking about duct tape or paper packing tape? Anyway I think her idea of making a guide is probably a very good one as long as you can move the guide around. Here's a home made one that you can easily move around to suit your purposes:
ReplyDeletehttp://sewalluring.com/easy-diy-seam-guide-made-with-household-items/
I hope that helps. I think you're doing great with your new-found hobby, by the way!
I still can't sew a perfect straight line... (sewn since I was 10, and that was more than 5 decades ago... half a century ago!) I blame atmospheric conditions. You can make things without being perfect. I've made clothing when the kids were little, and quilts more and more over the years. If you want perfection you are going to have to wait for heaven. While you are on earth you should "Just Do It" and enjoy yourself.
ReplyDeleteHugs!
The tape I refered to is called Stapping Tape and it looks like this:
ReplyDeletehttp://www.gobrushless.com/shop/media/ccp0/prodlg/tartan%208934.jpg
You can easily peel it off and repositon it. When you have moved it so much it won't stick anymore, you peel off the bottom layer and voila! it sticks again!
Love it Mich, and great to see you back on craft schooling Sunday! Oh boy, you've started to sew? watch out world, more brilliant ideas using sewing machines on the way. I have two old machines in my house but somehow have a block that using them will just be too much of a pain, even though I know in my heart that I too need to use a machine, and can make so many great things. I'm sure it won't take you long to get it, as you're already an accomplished crafter!
ReplyDeleteThat's strapping tape.
ReplyDeleteIt think a lot of it is where you keep your eyes. Line up the item on the straight line inscribed on the machine, there's always one or part of one. Crank the needle down where the line should go, and stare at it. Start slow and keep your eye on one side or the other and you will be able to feel that you are on or off track and can get back in line quickly.
Don't take your eye off the material until you must. If you have to rearrange the material, stop the machine with the needle down through the fabric, do what you gotta, and then get your eye back on your work.
I just love wrap bracelets. This is such a cute idea. Here is the bracelet I made.
ReplyDeletehttp://scobellexpressions.blogspot.com/2012/03/pinterest-finds.html
I would love for you to follow my blog. I am for sure going to follow you :)
Your imagination has been hard at work again. Ooh, love the pink!
ReplyDeleteI hate to tell you this, but I used to be able to sew a straight line when I was a much younger seamstress. These days, I have to make sure I have no more than two cups of coffee in my system.
This comment has been removed by the author.
ReplyDeleteI can't sew in a straight line either. Don't feel bad. Will a lot of your projects in the future involve sewing? Sewing and crafting with Mich L in LA! At least your machine isn't fussy. Mine throws a tantrum if I try to zig zag and it isn't even that old.
DeleteO.T. thanks for telling me about Fire Mountain Gems and Beads. I love that website. I have a hard time deciding what I want to order though. So many beads, so little time, I suppose.
I deleted the other post to make a correction.
I totally love it and you had me cracking up with your sewing machine comments. I love how the stitching turned out. So "sew" cool! Thanks for sharing at this week's party !
ReplyDelete