Last time, I showed you my 'tennis bracelet' cuff, made from an actual tennis ball.
There were a bunch of comments and emails about that spiral beaded bauble, so I thought I'd do a tutorial. These are super fun to make.
You'll need some heavy craft wire and some skinny craft wire. (The gauges aren't really precise; the heavy wire should be stiff enough to hold your beads without sagging; the skinny wire should be thin enough to twist with your fingers.)
Cut a piece of the heavy wire, anywhere from 6 to 12 inches. The longer it is, the bigger the finished spiral. Wrap it around a cylinder...
...to make a simple coil.
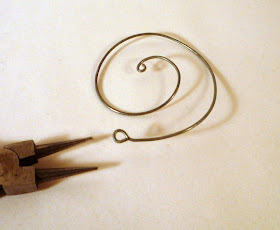
With your fingers, work the coil into a flat spiral shape. Doesn't have to be perfect! Just vaguely spiral.
Make a loop on each end.
Now grab a loooong piece of the skinny wire. Anywhere from three to five feet. Don't be shy, you will be using a lot!
Choose a bunch-o-beads. How many? I couldn't tell you. A bunch! Thread one onto the wire. Near one end, fold the wire down against the bead, like this:
Be sure to leave a wire tail a few inches long, you'll need it later. Now spin the bead a few times, twisting the wire together:
If they aren't evenly spaced, no biggie! This is pretty free-form and foolproof.
Fill up your skinny wire with twisted beads, until you have a long twine-y, vine-y thing. (This is a mindless, relaxing process; I do it while watching TV.) It will look like this:
How long should you make it? That's kind of fluid. Maybe a couple of inches longer than your wire spiral. The longer it is, the fuller of beads your spiral will be. (Personally, I just go until I feel like stopping. It's really hard to do it wrong!) The important thing is to remember to leave a wire tail free at this end, too.
Thread one wire tail through the center loop:
Wrap the tail several times until it feels secure; trim any excess. Now begin wrapping your vine-y thing around the wire spiral:
Notice I opened out the spiral for this step - it just makes it easier to wrap. When you've wrapped all the way to the end, secure it by wrapping and trimming the wire tail as before.
Here's what you get:
Doesn't look like much right now, does it? Chaos! The beads are every which way. But now comes my favorite part.
Re-shape your wire again, into a reasonably regular spiral. Now just start arranging the beads, sort of as you would a bouquet of flowers. There's no way to show a picture of this - but you will twist and turn, fluff and floof until you like where each bead is sitting...
And voila!
You took that out-of-control spiral, and turned into a pretty bauble for you! If you ended up with too much extra wire between your beads and the wire loop end, as I did on this piece, you can either trim it shorter, or spiral it up, as in the photo above.
There are endless looks for these, depending on your choice of beads. And so many ways to use them! Make them big and wild, to use as grand statement pendants.
Or for a subtler look, try a smaller diameter. Like the little purple one in the photo below:
But don't stop with pendants or cuff bracelets. Consider them as a general embellishment. Sew them to anything! How about a purse, or a hat, or a bib necklace?
And I know it's a little early in the year...but I'm kinda thinking...
Xmas ornaments! Hey, it's never too early to start collecting holiday ideas, right?
Anyway, that's it! I hope you have fun trying this.
Because it's always cool to see order emerge from chaos.


Next pay day, I shall invest in wire... :)
ReplyDeleteso amazing!
ReplyDeleteI was looking at a way to do this today... I am so glad I found your blog! this tutorial is great thank you for sharing it.
ReplyDeleteEasy enough. I'll have to try that some day.
ReplyDeleteSophie
Very cute! I adore all of your stuff.
ReplyDeletemore metal for me to play with...yay. lately metal has been good to me from pop tabs to safety pins. now on to wire. I like the whimsical feel of this.
ReplyDelete#1. Love the order-from-chaos decorations. beautiful!
ReplyDelete#2. Is floof a word?
#3. I really like the way you set up your photos. I gotta on being more creative with photo shoots like that.
Cool idea!
ReplyDeleteOoooooooooh, I SO see these on a headband, how cute would that be?!?!?!? Thanks so much for linking up to gettin' crafty on hump day! :)
ReplyDeleteVery cool....and surprisingly simple. Thanks for the tutorial, I will definitely be trying this!!
ReplyDeleteGreat tutorial...thanks. I love the way you did this, and I'm so lucky I have everything on hand! I'm going to give this a shot!
ReplyDeleteI was hoping you'd link this up! So cool!!!
ReplyDelete