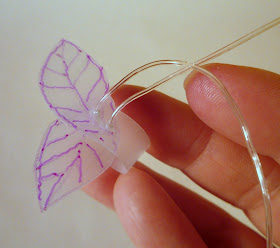
We interrupt our previously scheduled craft, to bring you a fun ring tutorial. (I had an idea for a different project, tried for 3 days to make it - it refused to jell. Sometimes you just gotta move on.)
During my visit to Seville, I found a glorious maze-like pedestrian district, filled with crafty shops. I could wander there in a happy daze for a week. My absolute favorite corner of the maze was a bead shop, the likes of which I have never seen before, and probably will never see again. Take a deep breath, and behold what I purchased:
More about the shop in a future post. On to this super simple ring idea. I love using unique beads in ring designs, where the specialness of the bead is featured front and center.
Start with some plastic junk or scraps of felt. Raid your junk drawer, fabric stash or recycling bin.

I free-handed this template for the base of the ring. It's basically just a strip about 2 and a half inches long, with a leafy shape at each end, pointing in opposite directions. To size the ring smaller or larger, adjust the length of the center strip.

Cut out your ring base. Then draw some leafy veins with a Sharpie.

(Note: if you've got a piece of especially slippery plastic, the lines may tend to rub off - they'll still be there, but fainter. Test your plastic/Sharpie interface first; if your drawing wants to rub off, you can hit it with a little spray of clear sealer, or you can sandpaper the plastic before you draw, to give the surface some bite. OR just find another piece of plastic that likes the Sharpie better!)
Poke two strategic holes, like this:

Put a headpin through the holes, crossing the leaves over each other.

Thread on a bead or two. Make a loop in the end of the wire to hold the beads in place. You have your leafy upcycled ring!

Isn't that pretty?

Instead of a loop at the top, you can do little curlicue:

For a different look, add an extra leaf to your template...

...to end up with an extra leafy one:

But wait - let's say you're not a jewelry person. What if you don't happen to have a headpin and some loop-making round-nose pliers handy? Then you will love this variation. No tools needed! (Except a pair of scissors; those don't count, do they?)
Cut out and draw leaves on your ring base as before. Find any kind of string, thread or cord that will be a cute match.

This time, poke four holes instead of two, like this:
Cross your leaves over each other, as before. Thread your string up through the holes, so the two ends are coming out the top.

Thread both ends through the bead, tie a knot at the top, and check it out!

Look, ma! No tools!
Make a bunch. Love 'em. Wear 'em. That's a plan.


Love these rings!!! Perfect for summer! Thanks for showing us 2 different ways to make them too!
ReplyDeleteThanks for sharing! These are adorable and I can't wait to try my hand at them.
ReplyDeleteThese are so adorable!!!
ReplyDeleteThanks for linking up to the Mad Skills party!
What a great idea!!! I love it!
ReplyDeleteI can't get over how simple you made this look! The rings are just adorable!
ReplyDeletehttp://iheartjennysart.com
Those beads are amazing! Thanks for joining us for Anything Related! ~Bridgette
ReplyDelete